0.00 $
You a Peel to me
Hi dear readers ..
It’s me, Yulis 🙂 I thank you so much for stopping by today, this time I would love to share a project using Magnolia products and also popping in to share a few fun things. Hope you will inspired!
![]()
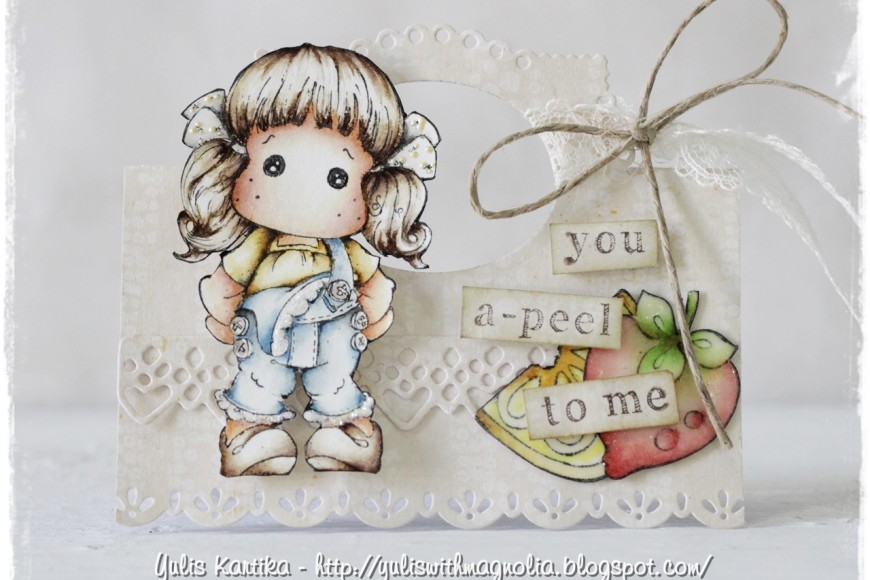
 It’s look like a small shape card, isn’t it ? But you can use it for a treat topper, a candy hanger or goodie bag handle 😉
 I use Tilda with Summer Pants from Pink Lemonade Collection, the fruits also coming from the same collection and as well as the words… hey, thinking for summer when the snow still falling may be something nice 🙂
I use lovely DooHickeys to make that topper, and I will show you the steps to make it ..
 Paper is 4″ width and 5″ height please make a pencil mark at 2.5″ in height
 You can see on the picture how I do a partial die cutting with a frame dies, I love this frame so much .. it has a very versatile and beautiful shape. Partial die cutting isn’t easy to explain, so I hope the picture is helpful
 After you roll your cutting machine, it will look like this
 Now we can make the edge more beautiful with border, lots of DooHickeys borders have gorgeous shape but I can say that The Swedish lace is my favorite all the time (that’s why I have two pieces .. LOL!!) and on the center of the frame you can cut to oval, circle any shape will be fine.
 Score on the pencil mark, if your paper thick enough I recommend you to use a score board, but if your paper quiet good to hand fold it is also nice.
 Everything finish now .. yey! we have a topper and it so ready to decorate.. How if we go to shopping now ? Chocolate, Candies and may be some stationery like crayons 🙂 kids will be happy to received a goodies bag but your loved one also treasure for some sweet treats .. Valentine will coming soon!!
That’s from me today .. Hope you will enjoy my post and will to see you again soon!
Thank you so much and wish you a great great day!
xoxo, Yulis
This is So Sweet!!.. Perfect Coloring of Tilda´s hair!!.. Gorgeous shades and shine in her Clothes.. Great Idea.. The Topper for the gift bag is Beautiful!!.. Lovely Work.. and Great Tutorial.. Sweet die you have used.. FAB result!!
Great tutorial!
Hugs
Claudia
Hi Yulis, I love this tutorial. I’m sure I’m gonne make this. Thank you! Hugs Carla.
You are so creative, mbak…. Love the tutorials.. It really useful anda versatile for any project.. Very well done 😉
So beautiful project!!!Thanks for inspiration!
This is so cute, wonderful idea, thanks for sharing
Hugs julie P
Oh Yulis, you are always sharing and teaching us how to improve or skills! I love this tutorial and will give it a try! I love how you colored Tilda. Thanks you so much for sharing!
XO,
Chris Christensen
I love the card, it’s very cute! 🙂 <3 The saying and the fruits did indeed make me thinking about summer, in the middle of winter, with the snow falling outside the windows. 🙂
Beautiful bag topper, great tutorial! x
Soooo beautiful card here today. Very sweet and elegant.